여기서 잠깐! flake8 은 에러를 찾아주고, 통일된 형식으로 코드를 작성하는걸 도와준다.
random 모듈 안쓰임 def lower(a) 옆에 : 생략 # 앞에 공백 최소 두개는 있어야함
yaml 파일의 구조(환경설정에 많이 쓰임) 1 : 그리고 ' ' 공백으로 구분 2 리스트시 -와' ' 공백 3 키(contact) 서브키(phone) value(home, work) 를 공백 두개씩 차이남 4 | 사용시 엔터 해도 this ~string 까지 하나의 value로 인식
+ json 과 yaml 의 차이
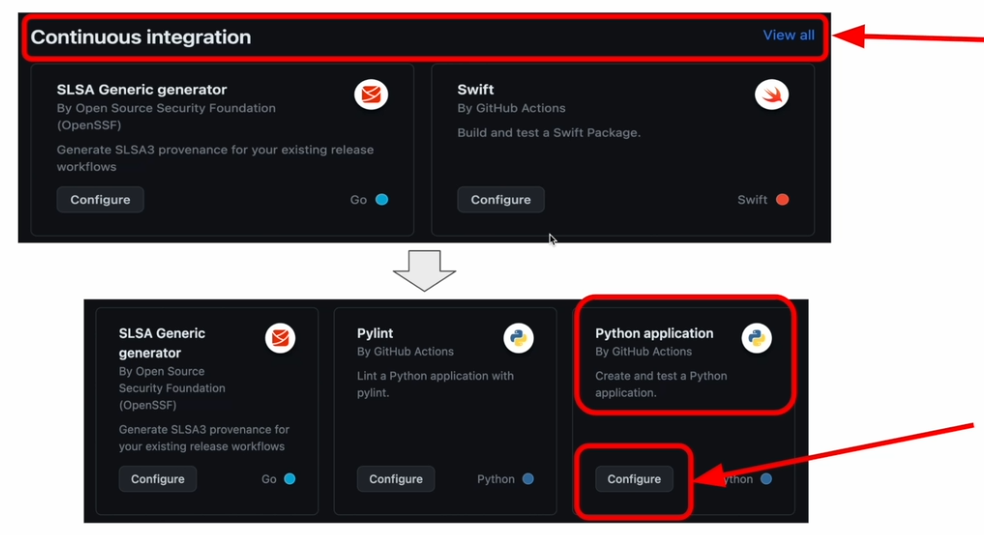
실습1: github actions 실습
CI에서 python application 선택
yml(or yaml) 파일 편집 : main branch에서 push 나 pull 을 요청시 액션스 실행 조건
자동으로 내용이 채워지는데 일부 수정 필요.
name: Python application
on: push: # main 브랜치에 push 이벤트 발생 시 branches: [ "main" ] pull_request: # main 브랜치로 pull request가 생성되었을 때 branches: [ "main" ]
permissions: contents: read
jobs: build:
runs-on: ubuntu-latest
steps: - uses: actions/checkout@v3
# Python 3.10 설치 - name: Set up Python 3.10 uses: actions/setup-python@v3 with: python-version: "3.10"
- name: Install dependencies run: | # pip를 최신 버전으로 업그레이드 python -m pip install --upgrade pip
# flake8 패키지 설치 pip install flake8
# requirements.txt 파일이 존재하면 해당 파일에 명시된 의존성 패키지들을 설치 if [ -f requirements.txt ]; then pip install -r requirements.txt; fi
- name: Lint with flake8 run: | # Python 문법 오류나 정의되지 않은 이름이 있으면 빌드 중단 flake8 . --count --select=E9,F63,F7,F82 --show-source --statistics
# exit-zero는 모든 오류를 경고로 처리합니다. GitHub 에디터는 127자 폭 flake8 . --count --exit-zero --max-complexity=10 --max-line-length=127 --statistics
- name: Test with unittest run: | # m은 모듈을 지정하는 옵션, unittest 모듈을 실행하라는 의미 # -p는 파일 패턴을 지정하는 옵션 python -m unittest discover -p 'test*.py'
#로그인 실행 -u(유저) -p(비밀번호) run: | docker login -u $DOCKER_USER -p $DOCKER_PASSWORD - name: Build the Docker image # 도커 이미지 만듦 run: docker build --tag ${{secrets.DOCKER_USER}}/hangman:latest . - name: docker push # 만든 이미지 도커허브에 업로드 run: docker push ${{secrets.DOCKER_USER}}/hangman:latest
+ 들여쓰기 잘해야합니다. 잘못하면 빨간색 밑줄 뜨는데 스페이스로 잘 조절하면 없어짐. + 다 수정후 commit changes 클릭
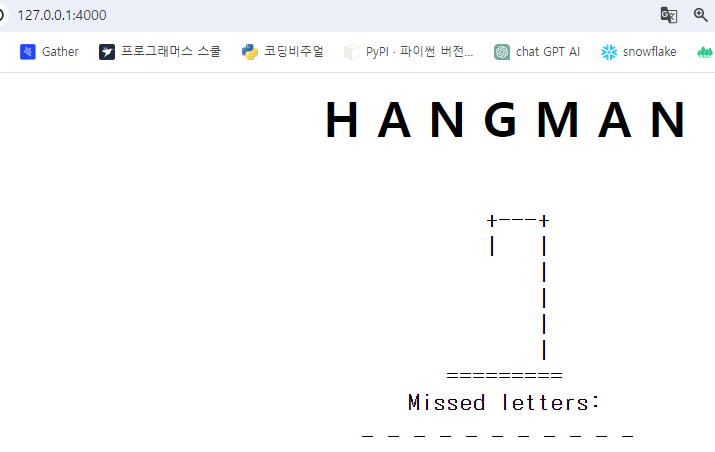
동작 확인
로컬에서 깃 내용 다운후 실행 까지 해보자
# 현재 로컬에 실행중인 legoking/hangman 찾음 weare@DESKTOP-BE1I4GE:~$ docker image ls REPOSITORY TAG IMAGE ID CREATED SIZE legoking/hangman latest f63deabbaf88 2 days ago 155MB apache/airflow 2.5.1 cb77a108637f 11 days ago 1.23GB ubuntu latest 174c8c134b2a 2 weeks ago 77.9MB postgres 13 135171763bd4 2 weeks ago 413MB redis latest e40e2763392d 3 weeks ago 138MB docker/welcome-to-docker latest c1f619b6477e 7 weeks ago 18.6MB mysql/mysql-server 8.0 1d9c2219ff69 11 months ago 496MB
# 삭제 weare@DESKTOP-BE1I4GE:~$ docker image rm -f f63deabbaf88 Untagged: legoking/hangman:latest Untagged: legoking/hangman@sha256:5423af489767acf74d147fd86b81d6683b8c0c1b057f86b9007fa5115a916d29 Deleted: sha256:f63deabbaf881311d0ba660aed5ab2f313fabdfc10b23603750518663ab7538c weare@DESKTOP-BE1I4GE:~$ docker image ls REPOSITORY TAG IMAGE ID CREATED SIZE apache/airflow 2.5.1 cb77a108637f 11 days ago 1.23GB ubuntu latest 174c8c134b2a 2 weeks ago 77.9MB postgres 13 135171763bd4 2 weeks ago 413MB redis latest e40e2763392d 3 weeks ago 138MB docker/welcome-to-docker latest c1f619b6477e 7 weeks ago 18.6MB mysql/mysql-server 8.0 1d9c2219ff69 11 months ago 496MB
# legoking/hangman를 받는데, 로컬에 없으니 깃허브에 가서 자동으로 받아옴 # -p 4000:4000 이건 내부 콘테이너 4000을 외부 4000 포트로 포트포워딩 (이래야 4000 주소로 접속가능) weare@DESKTOP-BE1I4GE:~$ docker run -p 4000:4000 legoking/hangman Unable to find image 'legoking/hangman:latest' locally latest: Pulling from legoking/hangman 8b91b88d5577: Already exists 824416e23423: Already exists 8f777578c172: Already exists cbfea27109a8: Already exists 276dfcf5deff: Already exists b4e3c0c59c7b: Pull complete 5a0899081932: Pull complete 2aa60784fc2e: Pull complete a8f2ad823d12: Pull complete Digest: sha256:51711cd316ca73213223e44e257ccda66453036d618963b4b46c23a7ff485bf4 Status: Downloaded newer image for legoking/hangman:latest * Debug mode: off WARNING: This is a development server. Do not use it in a production deployment. Use a production WSGI server instead. * Running on all addresses (0.0.0.0) * Running on http://127.0.0.1:4000 * Running on http://172.17.0.2:4000 Press CTRL+C to quit